Customising the parameter captions that appear on a KI-Keypad
Applies to V02.05.00 and later.
With Connect V2.5.0 you may customise the parameter captions that appear on compatible LCD keypads for Unidrive M400, M600, M700, and other drive variants. For example you can rename parameter 18.011 from "App Menu 1 RW Integer 12" to something pertinent to your application, such as "Conveyor line speed", or parameter 08.003 from "Digital I/O 3 State" to "Proximity sensor 1 state".
Checking if your keypad is compatible
To be able to download keypad language files or custom strings you need to ensure your keypad is compatible by doing the following:
- Launch Connect
- Create or open a project and go online to a drive that has a keypad fitted (either locally or remotely)
- Click on the Keypad Programming button on the drive dashboard.
- The tool will now check your keypad and will report back if it is not compatible.
Alternatively, look at the keypad firmware version in parameter Keypad.06 - the minimum supported is V1.2.0.8. To get into the keypad menu press and hold the  key whilst in status mode.
Note that the capabilities of what can be programmed on the keypad, i.e. how many languages can be stored on it and whether the firmware can be updated, depends upon the firmware and hardware revision of the device.
Editing the keypad parameter captions
Before starting you may wish to switch Connect into your local language first so that the default parameter captions are more suitable for you. With V2.5.0, parameter captions are available in English, German, Spanish, Italian, French or Chinese (simplified). Set the language via the File > Language menu.
You can customise the strings in the parameter listings views. By default, the keypad parameter title column is hidden from the listings view so you will need to enable it as follows:
- Open up a listings view for any menu
- Click on the Columns button on the toolbar above the listings grid
- Check the option Caption on keypad.
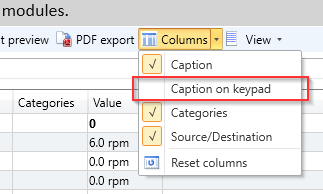
The new column will now appear and you may edit a string by double-clicking the cell.
Note that caption strings are limited to 32 characters in length.
Programming the keypad
To write the parameter captions strings to the keypad:
- Go online to the drive with a keypad fitted.
- Open up the Keypad Programming tool on the dashboard. This may take a moment to detect the keypad(s) you have fitted.
- Under 'Option 2' section, choose the language that your keypad strings will be identified by on the keypad if the default choice is not what you want. Note that this does not change the actual strings written to the keypad - it simply sets the language ID that your strings will be identified by.
- You may wish to enter in a custom name for your language, e.g. "Elevator" so that the language appears by this name on the keypad instead.
- Next you need to choose into which "slot" on the keypad to put your language. If the language you are programming (as defined in the drop-down language box) is the same as one already on the keypad in a different slot then the existing one will no longer be available as what you are about to program will override it. If this is not what you want then change the language in the drop-down to something else that isn't on the keypad. An example of when you might do this is if you have some strings in French for your flying shear application but you still wish to retain the original French language that came on the keypad. So now you'd choose another language, e.g. "Frisian" and type in "Fly Shear (fr)" in the language name box. Now the language you are programming has a different ID so both standard French and your custom French strings will be available.
- Press the Program Keypad button to start the programming. It will take a number of minutes to program. As soon as programming starts, any language in the selected slot will be erased so if you cancel programming the slot will remain empty.
- Finally, for older keypads you may need to reselect the language on the keypad itself if, after successful programming of the language file, you find that the parameter captions are blank.
Selecting the language on the keypad
Once programming has completed, you can select the language on the keypad by holding the ESCAPE () key for a second whilst the keypad is in status mode and then edit the language parameter (Keypad.00).
Erasing existing languages
Erasing an existing language on the keypad is simple - just select the language slot and press Erase Selected Language. The factory fitted English language is not erasable.
Restoring a language
Some keypads come with a number of languages pre-loaded. If you have erased or overwritten one of those and now wish to restore it, you may do so in a couple of ways:
- If you have a pre-packaged keypad language file (identified by the extension .keypadlang) you may select this file in the "Option 1" section and download it.
- Without a prepackaged file you will first need to ensure Connect is switched into the appropriate language (File menu > Language) and then create a new project and detect the drive with a keypad fitted then follow the procedure above for programming the keypad.
Copying custom captions to another drive/project in Connect
Customised strings for a menu or parameter caption / caption on keypad are saved in a parameter file, so if you wish to transfer these customisations to another drive in your project (or another project) you need to save a parameter file then load that parameter file into the other drive. Be aware though that the parameter values will also get copied over. To workaround this, first save the parameters on the target drive to a parameter file (or the actual drive) then load them back in after loading the custom strings parameter file (this works as long as the target drive didn't have customised strings first).
Issues / Limitations
The following limitations apply:
- You cannot customise the value strings for enumerated parameters
- When programming custom strings, only strings for the drive/option menus and parameters as configured in the project device in Connect will be programmed on the keypad.
- Custom menus are not supported
- Menu 0 caption cannot be set.
- Some languages may not have localised strings for some parameters/menus
- If you default a keypad string whilst online the customised string may return when you reload the project - workaround by defaulting the string when offline
- Menu names may not be displayed on older keypads.
- In Connect, the terms "local" and "remote" keypad actually refers to whether the keypad is connected to the dedicated keypad port on the drive, or to the user comms RS485 port. Therefore a keypad connected via a KI-485 adapter will be shown as a "local" keypad rather than remote as you might expect (ultimately, the connection is still to the drive's keypad port).
Using remote keypads
The remote mountable keypad (not the KI-Keypad) is connected to the drive via a RS485 connection (with RJ45 connectors and 1:1 wiring). The connection on the drive can be to a KI-485 adapter fitted into the keypad position on the drive, or it can be connected to the user RS485 port on M701 for example.
When connecting to the user RS485 port the following serial port settings must be made (for the KI-485 this is not needed):
- Baud rate (Pr11.025) = 115200
- Mode (Pr11.024) = 5 ("8 1 NP M")
- Address (Pr11.023) = 1
Note that a remote keypad connected via a KI-485 module will be shown as being "Local" in Connect since the port being used is the same one that would be used if the keypad was physically fitted to the drive itself.